Damages Caused by Bearing Failure and How they are Repaired
In a perfect world so to speak, an electric motor bearing can function for a very long time outlasting the motor itself.
The perfect condition for the bearing would be: that it is free of contamination, close if not perfectly aligned shaft, within tolerance shaft journal and housing fits, well-balanced and almost vibration-free rotor, ideal amount and good quality of lubrication, axial and/or radial load within the limit, and motor not experiencing overheating or overload.
But most of the time something always comes up and because the bearing is an integral part of the motor, once it fails other parts are most likely to be affected too.
When the bearing fails these are the things that can happen:
- Shaft Journal wears out or damaged and needs to be plated and machined
- Bearing housing wears out and has to be re-sleeved and machined
- Rotor rubbing the stator laminations caused damage to the windings.
- Collapsed bearing that makes the motor unrepairable.
If the motor is noisy and you are suspecting that the bearing is bad, It’s easy to say just replace it with a new one. Take apart the motor, remove the old bearing, slap in a new one, reassemble, and ‘done deal’. But not so fast.
The proper approach in replacing an electric motor bearing is to:
- Disassemble the motor
- Remove the old bearings
- Inspect the windings, and the core for any damage
- Check if the housing fits are good
- Check if the bearing journal is good
- Inspect the old bearings for any telltale sign of why the bearing failed and learn from it
- Replace the bearing with a new one
- Apply lubrication
- Reassemble the motor.
If we have a better understanding of the motor bearing and what it can do if we neglect it, we can avoid costly mistakes.
1. Electric motor bearing failure can wear out or damage shaft journals.
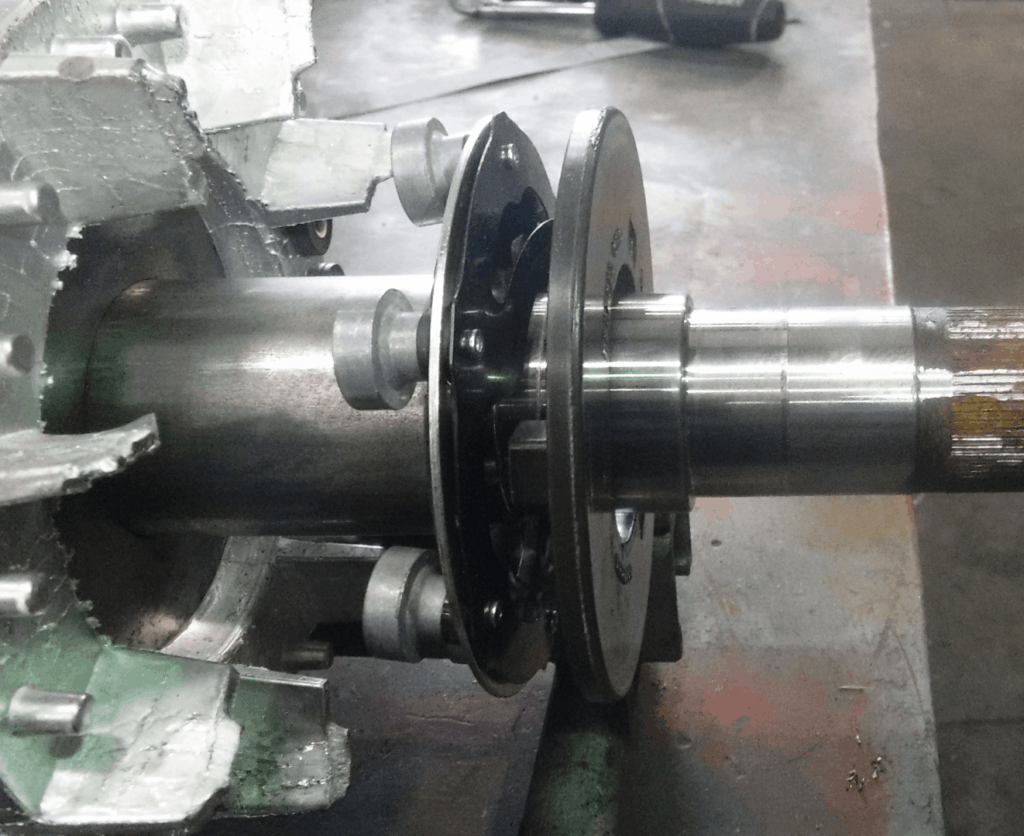
Bearing Journal is the part of the shaft where the bearing is in contact or located.
It has an interference fit which means the shaft journal diameter is bigger than the bearing bore or ID of the bearing inner race.
The shaft diameter is 0.0001 to 0.0004 inches (0.00254 to 0.01016 mm.) bigger than the inside diameter of the bearing. That is the reason why you need a puller to remove the bearing out of it.
The bearing inner race that sits in the shaft is stationary and is not meant to spin. They have standard tolerances, except for some special applications, to keep from spinning.
So why in the world will the journal wear out if the bearing is tightly held in place? It shouldn’t not unless the bearing inner race moves. But it will move and spin only if the inner race diameter of the bearing expands bigger than the shaft journal.
The metal expands with heat therefore if the bearing is hot due to for example lack of lubrication, the inner race will spin.
This metal-to-metal friction combined with the heat will wear the shaft journal not to mention the noise it will create.
Since the bearing is made of high carbon steel which is very hard, the shaft is more likely to wear out.
If the shaft journal is 0.0001 inches smaller than the minimum allowed diameter, it is considered worn out and needs to be repaired. That is unnoticeably small so how do we know if the shaft is undersized?
Besides obvious marks like discoloration on where the bearing sits on the shaft or bearing falling off the shaft without using a bearing puller, the best way to know if the journal is bad is by measuring.
Use a micrometer to see if the shaft is any good. If you don’t have a micrometer, bring it to a machine shop and have it measured for you.
The following table shows the minimum and the maximum allowed diameter of the shaft journal for every specific size of bearing.
For example, the size of the bearing you removed from the shaft is 6205. The table shows that the shaft diameter should be between 0.9844 to 0.9848 inches.
If you measure the shaft and it is 0.9842 inches or smaller, it has to be repaired. But if it is 0.9850 or bigger, that diameter is over the limit so the journal has to be polished down to 0.9848. If not, it will be too tight and it will just create damaging heat.
Table: Bearing Journal Tolerances
| 200 Series | 300 Series | Maximum | Minimum |
| 6200 | 6300 | 0.3939 | 0.3936 |
| 6201 | 6301 | 0.4726 | 0.4273 |
| 6202 | 6302 | 0.5908 | 0.5905 |
| 6203 | 6303 | 0.6695 | 0.6692 |
| 6204 | 6304 | 0.7879 | 0.7875 |
| 6205 | 6305 | 0.9848 | 0.9844 |
| 6206 | 6306 | 1.1816 | 1.1812 |
| 6207 | 6307 | 1.3785 | 1.3781 |
| 6208 | 6308 | 1.5753 | 1.5749 |
| 6209 | 6309 | 1.7722 | 1.7718 |
| 6210 | 6310 | 1.9690 | 1.9686 |
| 6211 | 6311 | 2.1660 | 2.1655 |
| 6212 | 6312 | 2.3628 | 2.3623 |
| 6213 | 6313 | 2.5597 | 2.5592 |
| 6214 | 6314 | 2.7565 | 2.7560 |
| 6215 | 6315 | 2.9534 | 2.9529 |
| 6216 | 6316 | 3.1502 | 3.1597 |
| 6217 | 6317 | 3.3472 | 3.3466 |
| 6218 | 6318 | 3.5440 | 3.5434 |
How to repair a shaft journal.
A worn-out or damaged electric motor shaft journal is repaired by Nickel or Chrome plating through an electrolysis process.
The rotor is mounted on a rotating machine but before going into the process, the shaft journal undergoes degreasing and then sandblasting using glass bead or silica sand while rotating to ensure proper adherence of the plating metal to the shaft.
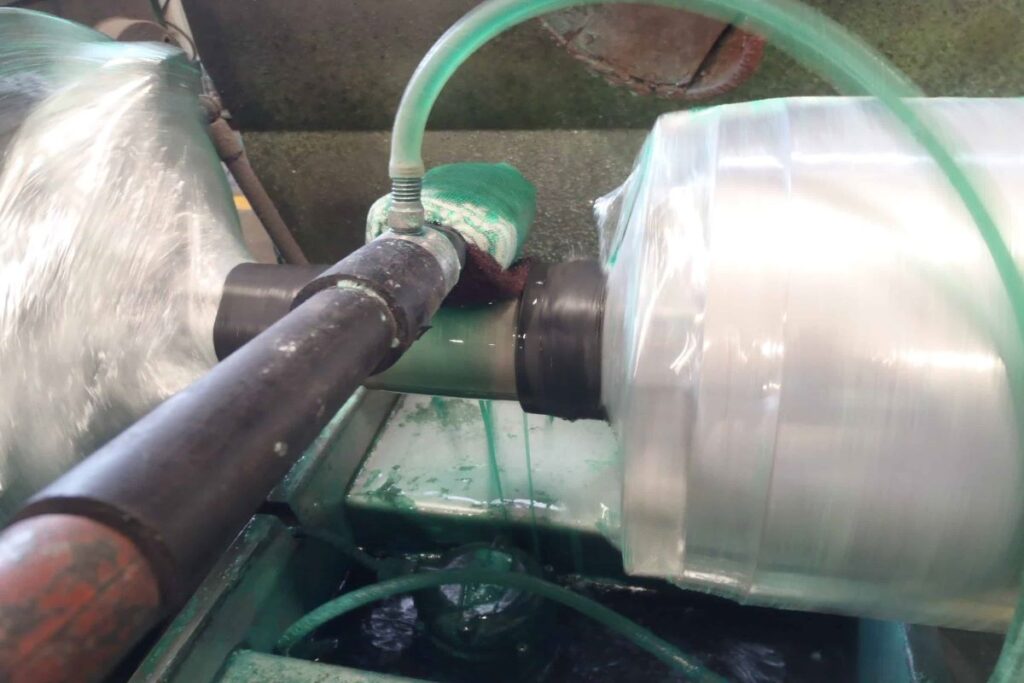
The machine where the rotor is mounted will serve as the negatively charged electrode and the wand with continuously flowing metal plating solution is the positively charged electrode.
This special wand allows the even distribution and build-up of metal to the specific part of the shaft while the rotor is slowly rotating.
All other parts of the rotor are taped or masked to avoid coating deposits on all other surfaces.
The diameter of the bearing fit is repeatedly checked until the build-up of metal is within the tolerance then it is lightly polished.
The length of time for the process is about 30 minutes to even hours depending on how thick the required build-up will be.
Other ways of fixing a worn-out shaft journal are:
- Electroless nickel plating uses a chemical autocatalytic reaction to deposit the coating instead of electrolysis
- Machining the shaft journal and building it up again by welding. Then it is machined back to the proper size. This allows a solid metal to metal bonding
- The use of spray welding instead of the regular welding to build up the shaft journal before machining it back to the right size
- Machining the shaft down and inserting a pre-machined sleeve. EZE Sleeve or EM Quik Sleeve are examples of the ready-made sleeve.
Of course, all of these repairs don’t come cheap. Buying a new one might be an option not unless the motor is special and pricy like a double shaft motor or threaded shaft.
A patch-up job offers a temporary fix to a worn-out shaft journal. It is not recommended but it can be used during emergencies until the replacement motor becomes available;
- One way is to apply a dab of Loctite retaining compound before bearing installation. Just a small dab will do the work. Putting too much can contaminate the rolling elements of the bearing.
The downside of Loctite is that when the bearing overheats again, combined with vibration, this adhesive breaks down and the motor is back to the same situation.
- Another way is by putting chisel marks or punch marks around the journal. Then the bearing is installed using a bearing driver.
Of course, again, these are just temporary fixes.
2. Electric motor bearing failure can cause housing to wear out or damaged
Bearing housing is a part of the electric motor end shield that houses the bearing. It has a sliding fit or also called clearance fit which means the housing diameter is slightly bigger than the bearing outer race or OD of the bearing.
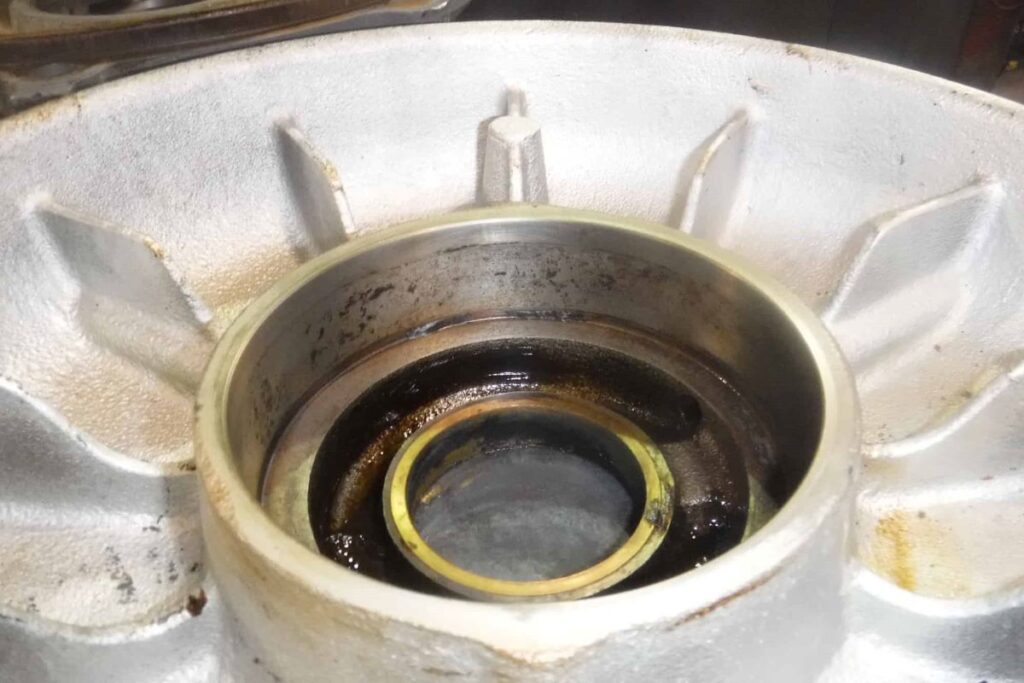
For example, the housing diameter of a 6208 bearing is 0.0001 to 0.0008 inches (0.00254 to 0.02032 mm.) bigger than the outside diameter of the bearing to allow for bearing expansion.
That is the reason why you can remove the end shield from the motor by just prying it out or installing it by just sliding it in. Not unless there is a snap retaining ring holding the bearing in place inside the housing or the bearing is full of rust.
The bearing outer race that sits in the housing is stationary and is not meant to spin. They have standard tolerances to keep them from spinning as soon as they expand during operation.
Retaining compounds such as Loctite is not necessary for as long as the housing is within tolerance.
Excessive axial and radial load combined with the rise in temperature due to lack of lubrication wears out the bearing housing.
When the bearing housing wears out, the diameter increases allowing the bearing outer race to spin in the housing
This metal-to-metal friction combined with the heat will not only wear out and damage the housing but will also create a squealing noise.
Since the bearing is made of high carbon steel, the housing is more likely to wear out.
If the bearing housing is 0.0001 inches bigger than the maximum allowed diameter, it is considered worn out and needs to be repaired. That is so small, how then can we know if the bearing housing is bad?
Obvious marks of discoloration on where the bearing sits on the housing would tell that the housing is bad. If there is no mark of wear, the housing should still be checked.
One way is by using a test bearing. It can be a brand new or a slightly used bearing, the same size as the one you removed.
This is how to check the bearing housing using a test bearing.
1. Clean the bearing housing. Remove any grease and dust particles.
2. Remove rust if there’s any by using a scotch pad or fine-grit sandpaper. After cleaning, lightly smear it with any kind of machine oil
3. Clean the test bearing. It should be the same if not the actual bearing removed from the shaft. Don’t worry about the bearing being worn out because they are made of high-carbon steel. Dab it with a thin layer of oil.
4. Install the bearing to the housing. If you do it straight and not on an angle, you should be able to do it by hand. Use a rubber mallet and tap it all the way around if you need to
5. Using your index finger and thumb, try to wobble the bearing side to side. A good bearing does not show any visible movement between the housing and the bearing outer race. Do that in different locations around the bearing.
6. Again using your index finger and thumb, try to rotate the bearing. You shouldn’t be able to spin or even move the bearing inner race on a good housing. If it does, the bearing housing is worn out.
The more accurate way of knowing if the housing is good or bad is by measuring.
Use an inside micrometer to see if the housing fit. Again, if you don’t have a micrometer, I suggest you bring it to a machine shop and have it measured for you.
The following table shows the minimum and the maximum diameter of the bearing housing for every specific size of bearing.
For example, the size of the bearing you removed from the shaft is 6208. The table shows that the housing diameter should be between 3.1503 to 3.1496 inches.
If you measure the housing and it is 3.1497 inches or bigger, it has to be repaired according to the tolerances given on the table. But if the housing diameter is 3.1502 or smaller, that diameter is undersized so the housing has to be polished up to 3.1503.
Housing that is too tight for the bearing will only create damaging heat due to a lack of room for bearing outer race expansion.
Table: Bearing Journal Tolerances
| 200 Series | 300 Series | Maximum | Minimum |
| 6200 | 1.1816 | 1.1811 | |
| 6201 | 1.2604 | 1.2598 | |
| 6202 | 6300 | 1.3756 | 1.3750 |
| 6301 | 1.4573 | 1.4567 | |
| 6203 | 1.5754 | 1.5748 | |
| 6302 | 1.6541 | 1.6535 | |
| 6204 | 6303 | 1.8510 | 1.8504 |
| 6205 | 6304 | 2.0479 | 2.0472 |
| 6206 | 6305 | 2.4416 | 2.4409 |
| 6207 | 6306 | 2.8353 | 2.8345 |
| 6208 | 6307 | 3.1503 | 3.1496 |
| 6209 | 3.3474 | 3.3465 | |
| 6210 | 6308 | 3.5443 | 3.5433 |
| 6211 | 6309 | 3.9379 | 3.9370 |
| 6212 | 6310 | 4.3316 | 4.3307 |
| 6213 | 6311 | 4.7253 | 4.7244 |
| 6214 | 4.9223 | 4.9213 | |
| 6215 | 6312 | 5.1191 | 5.1181 |
| 6216 | 6313 | 5.5128 | 5.5118 |
| 6217 | 6314 | 5.9065 | 5.9055 |
| 6218 | 6315 | 6.3002 | 6.2992 |
| 6219 | 6316 | 6.6939 | 6.6929 |
| 6220 | 6317 | 7.0876 | 7.0866 |
How bearing housings are repaired
Bearing housings are repaired by machining. This is done by installing a sleeve and then machining it down to the proper size. For example, you have an end shield that has a bearing size of 6209.
This bearing has an actual outside diameter of 3.3465 inches (85 mm.) and a depth of 0.748 inches (19 mm,)
Procedure:
1. From a steel pipe material, machine a sleeve with an outside diameter of 3.597 inches, an inside diameter of 3.297 inches, and a depth of 0.945 inches.
Chamfer cut one of the outside diameter edges.
2. Put the end shield also called the end bell on the four jaw lathe machine chuck and dial the machined outer edge.
3. Make sure that the face and the rim surface of the machined end bell edge are dialed to or close to zero.
4. Or, instead of the face of the end bell edge, you can dial the machined portion of the bearing housing which is parallel to the lathe machine chuck.
5. Machine the worn-out bearing housing down to 3.592 inches. Do not put any chamfer on this part.
6. With the chamfered side going in first, install the pre-machined sleeve into the bearing housing.
Tap it in using a steel or aluminum hammer. Do not worry about denting the edges of the sleeve. It will be machined afterward.
7. Dial the rim and the face of the end bell again to zero making sure it didn’t move during sleeve installation.
8. When the sleeve is fully inside the bearing housing, there will be an extra length of sleeve material sticking out. Use this portion to make a trial cut before proceeding with machining the sleeve.
9. Machine the bearing housing according to the tolerances given on the table for a 6209 bearing.
10. Machine off the extended portion of the sleeve and put a small chamfer to facilitate bearing installation. Done!
The machined housing’s diameter is 3.592 (91.2368 mm) while the sleeve is 3.597 (91.3638 mm). The sleeve is 5 thou (0.127 mm) bigger than the machined housing.
That clearance is important because if the fit is too big, the sleeve can warp but if it is too small, it can spin in the housing.
There are also other ways of installing the sleeve to the machined housing like freezing it using nitrogen and also by pressing it using either an arbor or hydraulic press, or the tailstock of the lathe.
Instead of machining a sleeve, ready-made ones are commercially available for example EZE- Sleeve or EM-Quik-Sleeve which are available in the market.
Although that in my opinion is the best way to fix worn-out bearing housing, there are other ways also. Some of them are:
a) Electroplating uses a nickel plating solution to deposit the metal coating through electrolysis.
b) Machining the bearing housing and building it up again by spray welding.
After the proper amount of metal build-up, it is machined back to the required size as indicated in the table.
c) Machining the bearing housing down and inserting a wavy tolerance ring.
d) Buying a replacement end bell for the particular brand and model of your motor.
Again, repairing a cheap motor may not be worth the time and money since electric motors nowadays are cheap, not unless the motor is special, pricy, or hard to find.
Temporary fix of the worn-out bearing housing.
I call it a patch-up job. It is not recommended but it can be used during emergencies until the replacement motor becomes available
1. One way is to apply a dab of Loctite retaining compound before bearing installation.
I recommend this only if the bearing housing is over by about 0.0001 to 0.0002 inches from the maximum tolerance given in the table.
Just a small dab will do the work. Again, putting too much can contaminate the rolling elements of the bearing.
Once again, the downside of using Loctite is that when the bearing overheats, combined with vibration, this adhesive breaks down and the motor is back to the same situation.
2. If the bearing housing is damaged already, you can patch it up by putting punch marks using a center punch around the housing.
The punch marks will create raised dents all around the bearing housing that will fit with the bearing a bit tighter.
A Loctite retaining compound can also be added to fill up the gaps.
3. Another way is by putting a knurl on the bearing housing. This is done by using a handheld knurling tool.
This will create crossed patterns with raised areas around the bearing housing that will make the bearing fit snug. Sometimes used in combination with Loctite retaining compounds.
Of course, again, these are just temporary fixes.
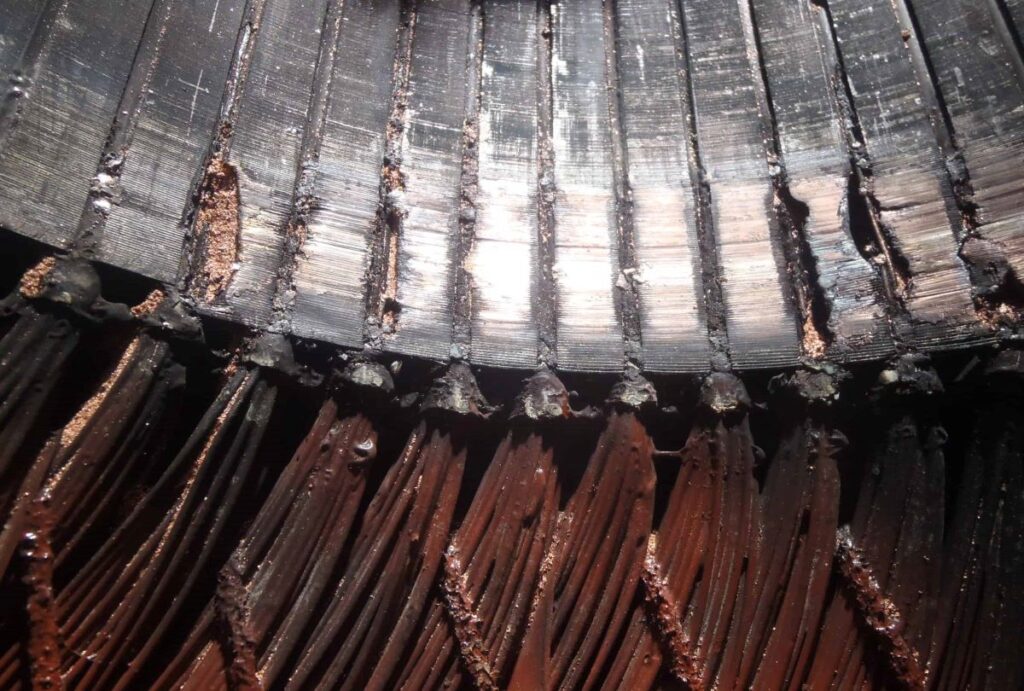
3. Bearing failure can cause the rotor to rub the stator causing damages
The bearings allow the rotor to spin inside the stator. Without the bearing that is not possible.
The magnetic flux on the stator will try to grab the rotor but because the bearing supports the rotor on both ends it will instead create a rotational magnetic flux to keep it spinning.
Bearings also maintain an air gap between the stator and the rotor. EASA explained this subject in one of their articles ( Air Gap: What Is It, What Does It Do, and Why Is It Important? – Resource Library – EASA | The Electro•Mechanical Authority)
The gap is about 0.016 inches (1.5 mm). Maintaining that small air gap between the spinning rotor and the stator is important not only for the efficiency of the motor but also to keep them from rubbing with each other.
If the bearing and the housing get damaged, the gap closes in and the rotor will touch and rub the stator.
Damages caused by the rotor rubbing the stator:
a) Stator lamination fuses together creating damaging heat
b) The laminated steel of the stator dragged sideways can result in shorted motor windings.
c) Rotor causes damage to the top wedges exposing and shorting the wires causing blow-up.
d) Bad rotor damage might require laminations to be restacked
Stator lamination fuses together creating damaging heat
The stator of an electric motor is made up of layers of 0.020 inches (0.5 mm) thick silicon steel laminations, individually coated, then stacked together to form the core of the stator.
The coating between layers of the silicon steel creates an inter-laminate resistance that helps in minimizing hysteresis loss and eddy current or circulating current in the core.
These losses have to be kept to a minimum so that the core will not heat up.
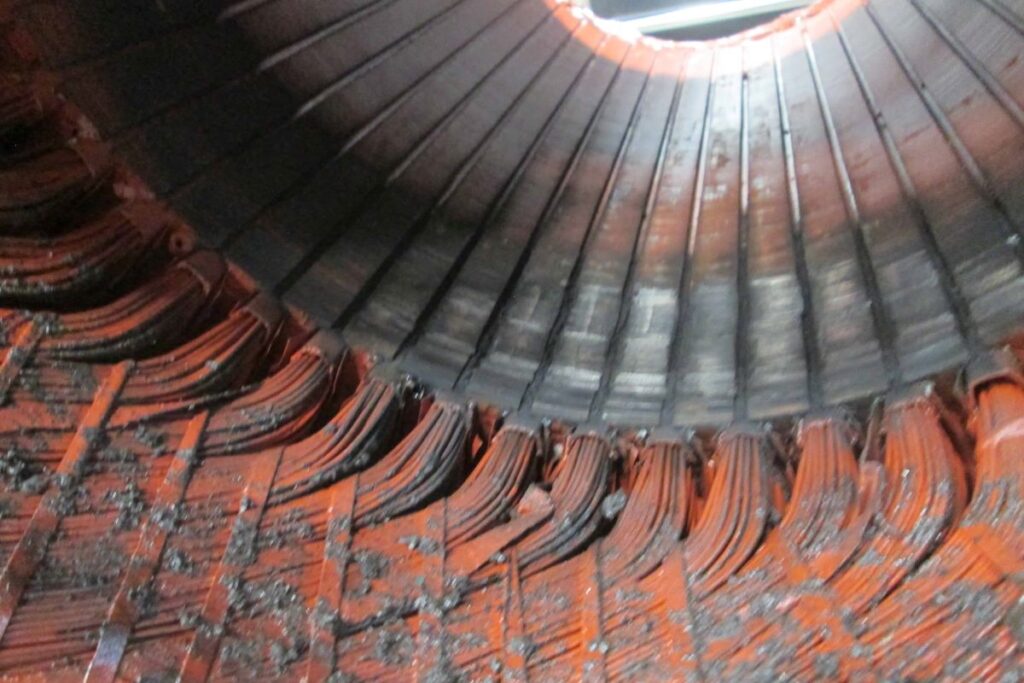
When the rotor rubs the stator, these laminations are fused together creating what we call “hotspots “.
When the motor is running, heat is produced in that portion of the stator and it is enough to burn the insulation causing the wires to be shorted to the core-
The laminated steel of the stator dragged sideways can result In shorted Motor windings
The stator core of an electric motor is not one solid piece of metal. They are thin layers of laminated steel tens to hundreds of them stacked together to form the core.
The portion of the lamination closest to the rotor is called a stator tooth and the space between teeth is called a stator slot.
Coils or magnet wires are in these stator slots and they are prevented from touching the steel core using insulation paper.
When the rotor rubs the stator, the tooth gets dragged sideways pressing onto the insulation and the coil creating electrical shorts.
I see this happen on smaller motors where the tooth width is narrow. The thin edges of the laminations tend to damage the insulating papers protecting the coils.
Rotor causes damage to the top wedges exposing and shorting the wires causing blow-up.
Top wedges also called top sticks are inorganic high-temperature insulating materials like NOMEX by DuPont or CeQUIN by 3M.
They are insulating papers formed into wedges and inserted right on top of the coil to protect and keep it from coming out of the slot.
Most of the time they are situated close to the surface of the stator and when the rotor rubs into it, they get damaged and stripped. The exposed wires are then rubbed to the spinning rotor blowing up the shorted wires.
Bad rotor damage might require laminations to be restacked
A stator core is made up of tens to hundreds of thin laminated silicone steels stacked together to form the stator core.
These laminated steel called laminations are magnetically insulated from each other.
It is designed this way to minimize eddy current or circulating current in the stator core because of the lower core power factor, and watts per pound of the stator.
When the rotor rubs the stator badly, there will be a need to re-stack the core especially if the motor is irreplaceable, the motor is special, or the new motor delivery will take a while.
If besides the stator the rotor is also damaged, the motor will be scrapped. The motor is beyond economical repair
4. Motor with collapsed bearing makes it unrepairable
Neglect and inexistent motor maintenance result in bearing collapse. This happens when a portion or all of the bearing balls comes off from inside the bearing.
The extent of damage makes the motor unrepairable or at least economically. It could be a combination of damaged end shield bore, two bearing housings, one or two journals, damaged rotor bars, stator core needing re-stacking, and/or rewind. It can be very expensive.
Tips on how to avoid bearing failure:
1. Regularly check the motor performance.
A maintenance checklist indicating the motor identification, temperature, noise level, vibration, date, and remark will be best for this, especially in an industrial setting.
Any abrupt change is a telltale sign that the motor needs attention.
.
2. Regularly have the bearings replaced. Bearings are cheap compared to the cost of replacing or repairing a motor.
Once a year or every two years, have it overhauled and the bearings replaced especially if the motor is loaded to its max.
3. Avoid subjecting the motor to water or corrosive chemicals to avoid rusting. There is at least 0.001 inches gap between the shaft and the end shield bore so water and moisture can go in.
When the motor is warm from the operation and then it will be idle for some time, rust develops in the bearings.
4. Replace or lubricate the bearing at the sign of an increased level of noise.
A small magnetic humming and noise coming from the fan windage are normally expected on a motor. But more than that, the bearing has to be lubricated
Lubricating a motor that doesn’t have a grease nipple might be a challenge. So, having the bearings replaced is a good option.
Conclusion:
Most electric motor damages can be prevented just by keeping their bearings in good shape
As I said, brand new bearings are cheap compared to the motor, and don’t even consider repacking it. Not worth it.
When the bearing makes noise, the damage to its outer race is done.
Damages Caused by Bearing Failure and How they are Repaired Read More »